
Fundamentals #
Terminology & Theory #
Control Plane #
API Server: All commands and requests are going through HTTPS calls to API server. Even control plane services are communicating between each other through it.
Cluster Store (etcd): Holds the state of all apps and cluster components. Every node (we will see later what node is) is running an etcd replica for HA but for large cluster it is recommended to run a dedicated etcd cluster. It is also recommended to keep an odd number of etcd replicas in order to avoid split brain situations.
Controllers: Kubernetes uses controllers in order to implement cluster intelligence. Some of those controllers can be Deployment Controller, Statefulset Controller, Replicaset Controller.
Controller Manager: Its responsible for spawning and managing controllers.
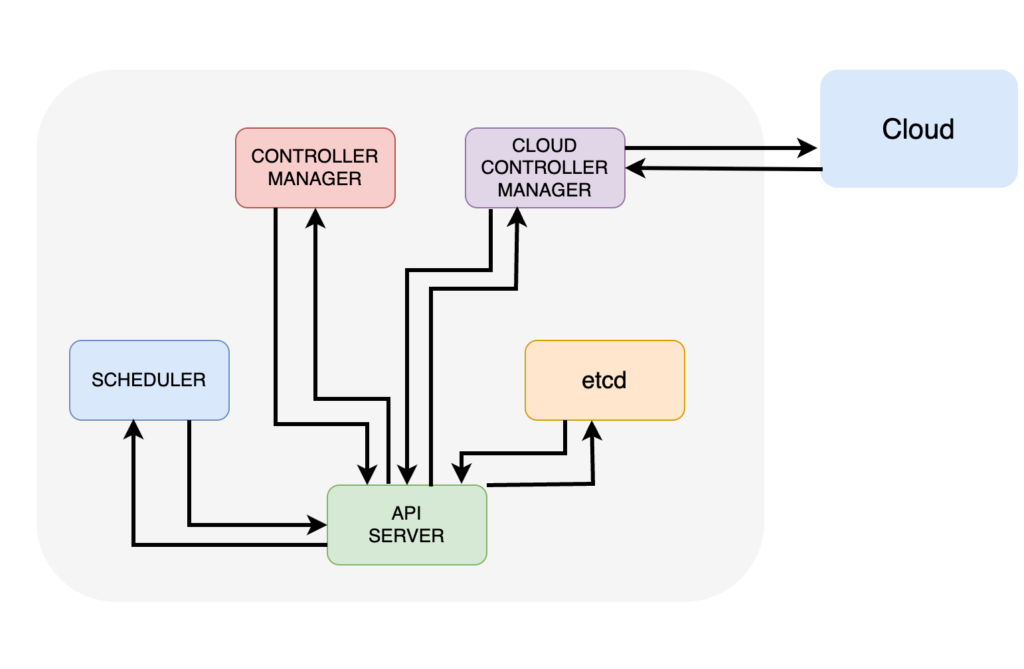
Scheduler: Communicates wih the API Server to get new tasks and assigns them to a capable node.
Cloud Controller Manager: For clusters that are on the cloud and the app requests a cloud service, for example a load balancer, the Cloud Controller Manager provisions it.
Worker Nodes #
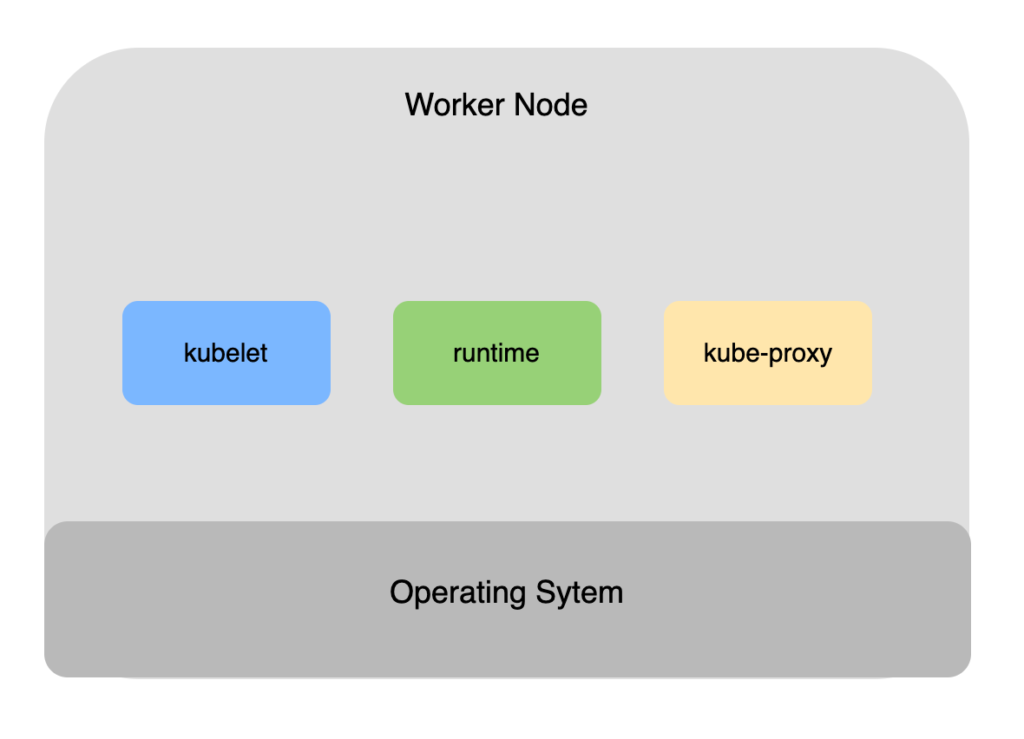
kubelet: It handles all communications with the cluster. Watches the API Server for new tasks and instructs the runtime to execute them.
runtime: Most kubernetes clusters have pre-installed containerd runtime and it is responsible for pulling container images and managing container lifecycle operations.
kube-proxy: every node runs a kube-proxy service which implements cluster networking and load balances traffic for tasks running in the node.
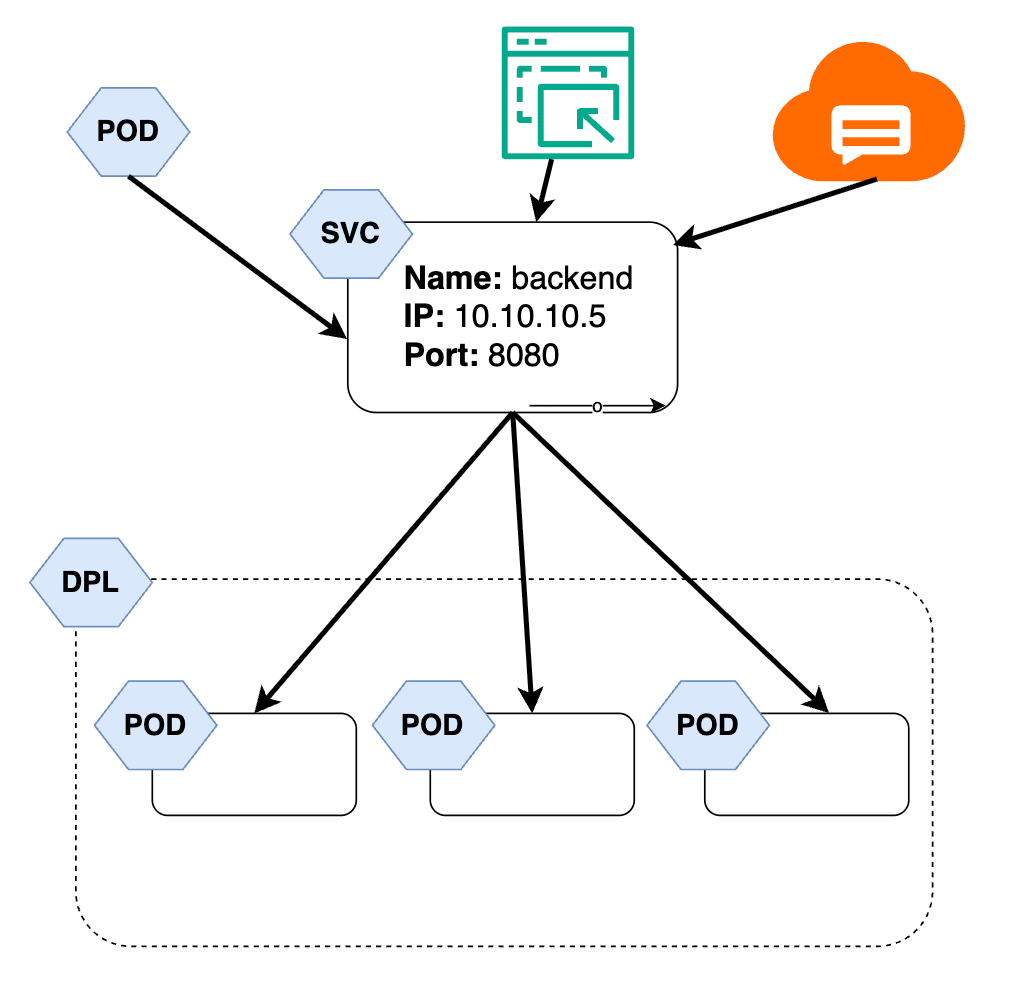
How Apps are packaged #
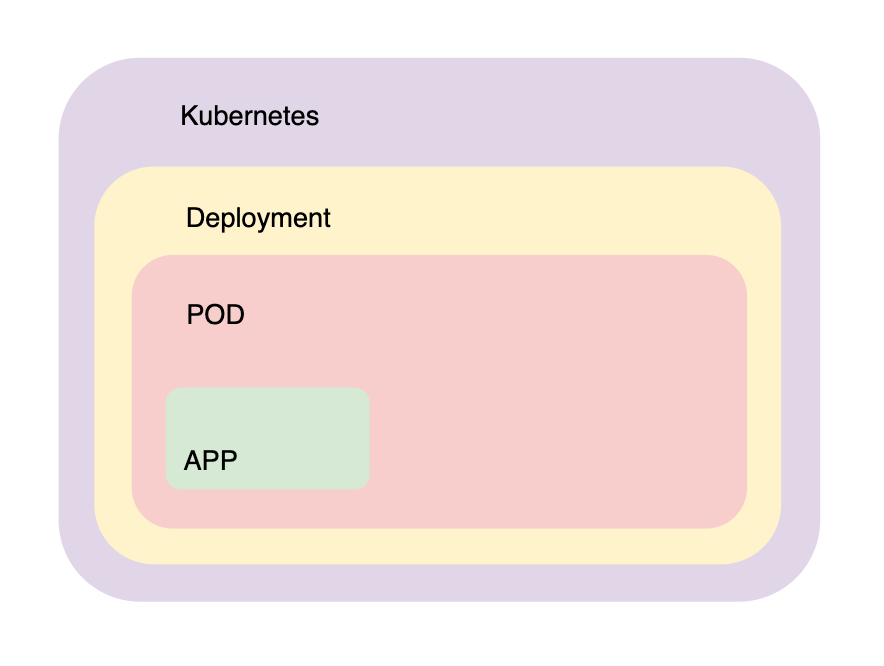
In theory we could just run a pod with k8s, but we would lose the bread and butter of k8s auto scaling and much more which are provided if we wrap this pod into a Deployment.
Here is a high level overview of how we can achieve that.
We package our app into a deployment yaml file, we post it to the API Server and kubernetes will persist it in the store.

Pods #
Kubernetes can run containers and many other apps but they all need to be wrapped in pods. A pod can run one or more containers. For example we can run service meshes, apps, helper sidecar apps or init containers to initialize the environment. This helps us to implement the single responsibility principle.
Scaling up and down means that there are new pod replicas are added instead of more containers of the application into the same pod.
A pod is a shared execution environment. For example all containers in a pod share the same IP, volume and memory. Containers in the same pod can communicate with each other using localhost and they must have different ports.
Dive a bit deeper into container technology #
Under the hood, Pod implement the same underlying technologies as the container inside the Pod. And what is a container?
A container is nothing more than am isolated processes created using mainly 3 linux concepts:
- Namespaces: provides isolation for process ID, network and file systems so each container has its own environment
- cgroups: Limit and monitor resource usage (CPU, memory, etc) for containers
- Union File Systems: Allow containers to have layered and efficient file systems
Basically a container is nothing more than linux namespecs, cgroups and ufs assigned to an isolated process.
Same applies to K8S Pod. Essentially it is a Kubernetes managed container which groups many isolated processes along with their namespaces, PIDs, network together and that’s why they can easily talk to each other.
In detail. those are the Pod’s execution environment namespaces:
- mnt namespace: Shared filesystem
- net namespace: Shared network stack
- IPC namespace: Shared memory
- pid namespace: Shared process tree
- uts namespace: Shared hostname
Pods scheduling rules #
The Kubernetes scheduler goes through these steps:
Step 1: Filter nodes (hard rules)
It removes any node that doesn’t meet strict requirements. Those requirements must fit.
Step 2: Score remaining nodes (soft rules)
It ranks the remaining nodes based on preferences. Soft rules are nice to have.
Step 3: Pick the best node
The Pod gets assigned to the highest-scoring node.
Node Selector
This acts as a hard rule. It is a simple key value match. For example The Pod must go to a Node labeled as disktype=ssd.
nodeSelector:
  disktype: ssd
Node Affinity
Acts as hard rule. It is like the Node Selector but more flexible (In, NotIn, Exists, etc.)
affinity:
  nodeAffinity:
    requiredDuringSchedulingIgnoredDuringExecution:
      nodeSelectorTerms:
        - matchExpressions:
            - key: disktype
              operator: In
              values:
                - ssd
Taints & Tolerations
Can act both as hard or soft rule depending on the effect used.
kubectl taint nodes node1 key=value:NoScheduletolerations:
- key: "key"
operator: "Equal"
value: "value"
effect: "NoSchedule"Resource Requests
This is a hard rule. A Pod must fit on a Node where the resource which is requested by the Pod is enough to support it.
resources:
  requests:
    cpu: "500m"
    memory: "256Mi"
Topology Spread Constraints
Topology Spread Constraints can be either hard or soft, depending on how the whenUnsatisfiable field is configured in Kubernetes.
topologySpreadConstraints:
  - maxSkew: 1
    topologyKey: topology.kubernetes.io/zone
    whenUnsatisfiable: DoNotSchedule
Node Affinity
Node Affinity in Kubernetes can act as both a hard and a soft rule, depending on the type used.
Using preferredDuringSchedulingIgnoredDuringExecution makes Node Affinity a soft rule while requiredDuringSchedulingIgnoredDuringExecution make it a hard rule.
preferredDuringSchedulingIgnoredDuringExecution:
  - weight: 1
    preference:
      matchExpressions:
        - key: zone
          operator: In
          values:
            - europe-west1
Pod Affinity & Anti-affinity
Affinity focuses on putting pods on the same node/topology to reduce latency.
Anti-Affinity prevents pods from being on the same node (e.g., to spread pods across nodes for high availability).
Example: Pods with app=web cannot share the same node.
apiVersion: apps/v1
kind: Deployment
metadata:
  name: web
spec:
  replicas: 3
  selector:
    matchLabels:
      app: web
  template:
    metadata:
      labels:
        app: web
    spec:
      containers:
        - name: app
          image: nginx
      affinity:
        podAntiAffinity:
          requiredDuringSchedulingIgnoredDuringExecution:
            - labelSelector:
                matchLabels:
                  app: web
              topologyKey: kubernetes.io/hostname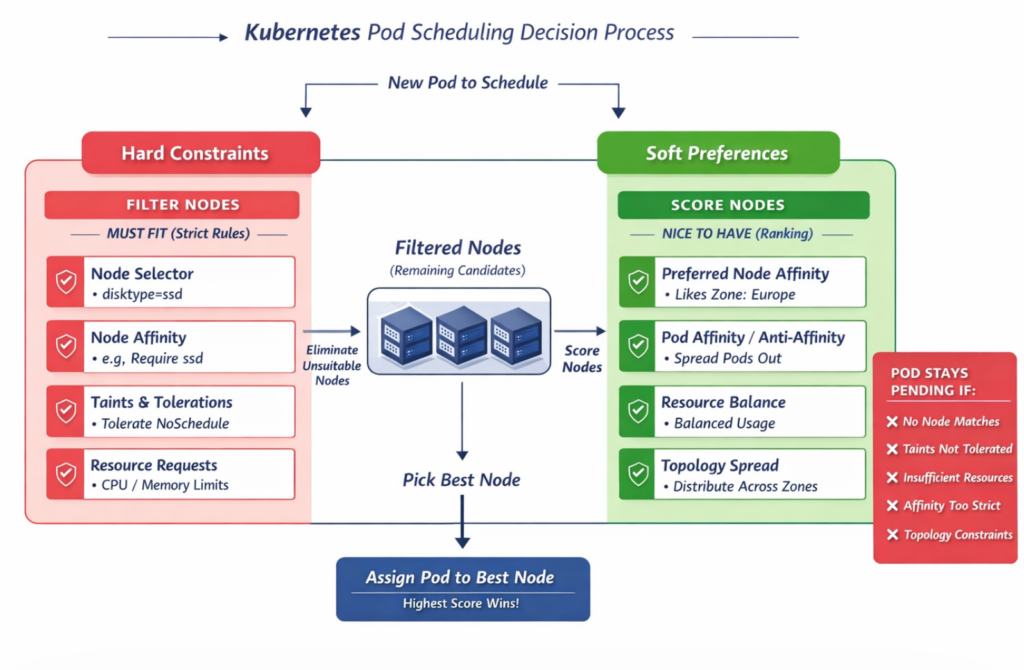
Pods resources assignment #
Pod resource assignment is all about how much CPU/memory a Pod asks for, how much it’s allowed to use, and how the scheduler & kubelet enforce that.
apiVersion: v1
kind: Pod
metadata:
  name: resource-demo
spec:
  containers:
    - name: app
      image: nginx
      resources:
        #i need at least this much to run
        requests:
          cpu: "500m"
          memory: "256Mi"
        #i must not exceed this much
        limits:
          cpu: "1"
          memory: "512Mi"
Pod lifecycle #
Pending
Pod is accepted by Kubernetes, image is pulled, scheduling not done.
Running
Pod is scheduled on a Node and containers are creating.
Succeed
All containers exited successfully (exit code 0)
Failed
Containers exited with failure.
Container States (inside pod)
⏳ Waiting
- Image pulling
- CrashLoopBackOff
- ErrImagePull
▶️ Running
Container is executing
🛑 Terminating
Completed or failed
Restart policies #
restartPolicy: Always | OnFailure | Never
Pod network #
Every cluster runs a pod network and automatically connects all the pods to it so even a pod which is living on another node can communicate with a pod on a different node. There are many tool to implement pod network but the most powerful at this time is Cilium.
Sidecars #
This falls under the multi container node concept. Sidecars are basically helper containers that can:
- proxy the traffic
- have automatic certificate renewals
- add monitoring and logging functionalities
An implementation of a sidecar concept is the service mesh like Istio which basically injects a proxy on each pod and this proxy is responsible for data encryption/decryption between pod network traffic, service discovery, traffic routing and load balancing as well as observability.
Kubernetes Namespaces #
Kubernetes Namespaces create virtual clusters. Do not confuse them with Linux kernet namespaces which create virtual operating systems (containers).
Following are some kubernetes objects that are created in namespace level and some that are not.
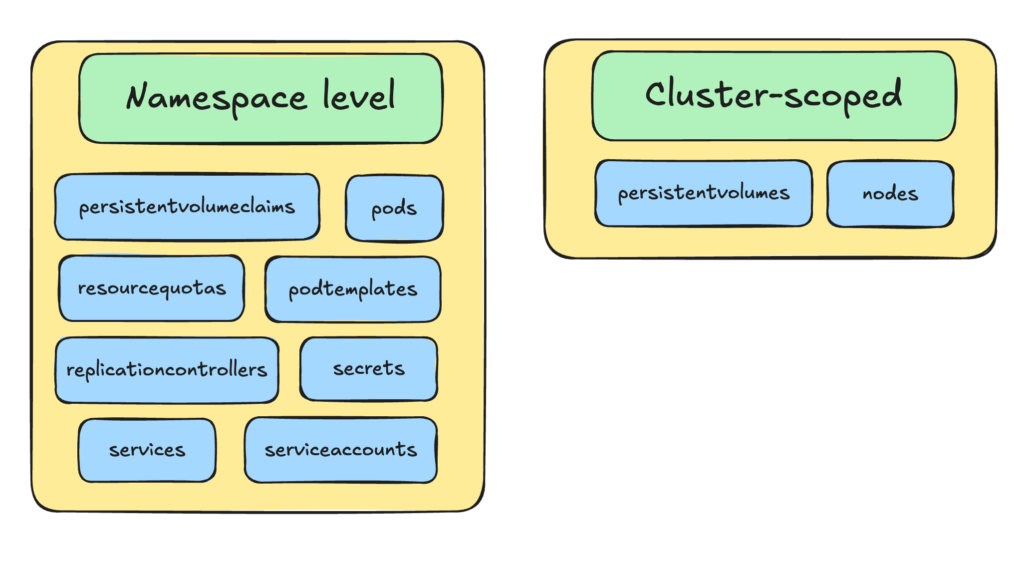
With Namespaces, multiple tenants can share the same cluster, but Namespaces are considered as soft isolation.
Default K8s Namespaces
default: the namespace where our resources go if we don’t specify a namespace
kube-system: The kubernetes “brain”
Contains core Kubernetes components:
- DNS (CoreDNS)
- Scheduler
- Controller manager
- Networking components
kube-public: Special namespace accessible to all users (even unauthenticated in some setups)
kube-node-lease: Node heartbeat tracking. Used by nodes to send lease updates. A Lease is a lightweight object that acts like a heartbeat signal. Each node has a corresponding Lease object in kube-node-lease namespace and updates it frequently.
Deployments #
A Deployment is a declarative controller that manages stateless applications.
Deployment defines a desired state:
replicas: 3
image: my-app:v1
And the controller manager makes sure this desired state is met.
The default Deployment strategy is RollingUpdate:
strategy:
  type: RollingUpdate
  rollingUpdate:
    maxUnavailable: 1
    maxSurge: 1
Deployment Rollaback: Deployments keep history via ReplicaSets, so when running the following command Deployments will revert back to the previous version.
kubectl rollout undo deployment my-appWe can also scale down or up a Deployment by updating the ReplicaSet:
kubectl scale deployment my-app --replicas=5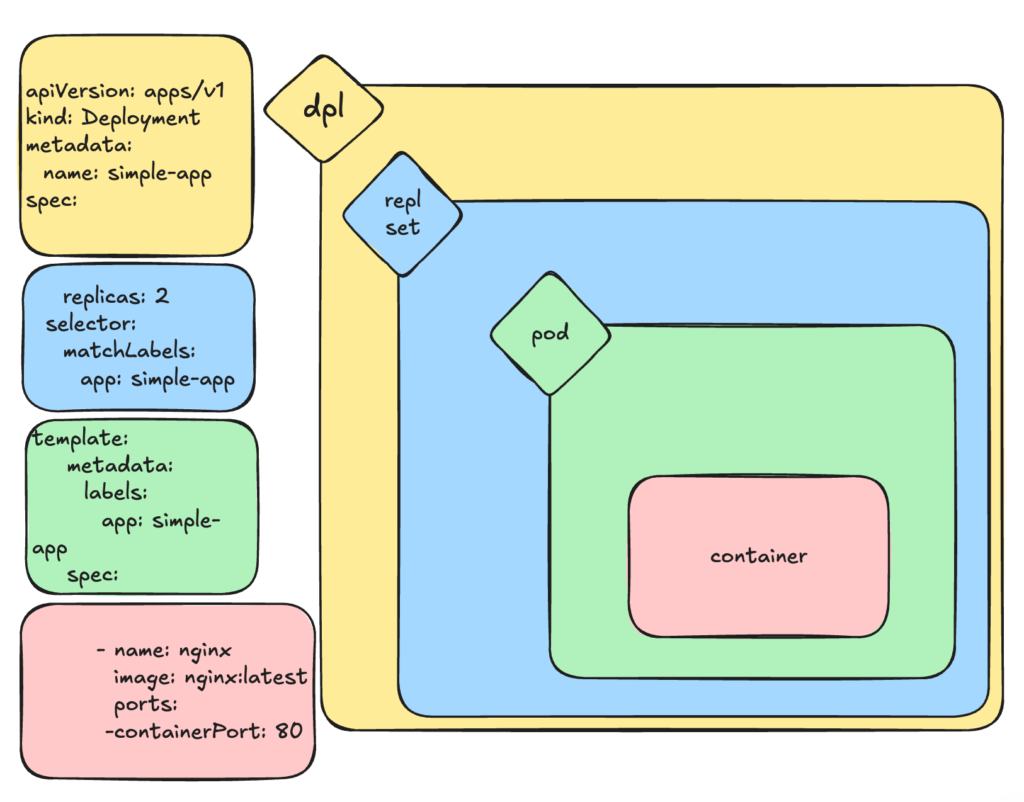
More about scaling
HPA: Horizontal Pod Autoscaler
Adds/removes Pods based on load (CPU, memory, or metrics). Mostly used for stateless apps.
VPA: Vertical Pod Autoscaler
Adjusts CPU/memory inside Pods. The operation is destructive since in order adjust CPU or memory in a Pod VPA kills the pods and created a new one.
CA: Cluster Autoscaler
Adds/removes nodes based on scheduling needs. For example, a Pod can’t be scheduled (no resources) and CA adds a Node.
Manifest File #
revisionHistoryLimit: 5          ---- Keep the config from the five previous versions
progressDeadlineSeconds: 300     ---- Give each new replica five minutes to start
minReadySeconds: 10              ---- Wait 10 seconds after the previous replica has started
strategy:
  type: RollingUpdate            ---- Incrementally replace replicas
  rollingUpdate:
    maxUnavailable: 1            ---- Can take one replica away during update operation
    maxSurge: 1                  ---- Can add one extra replica during update operation
Services #
When a pods are scaled, new pods get new IPs, when Pods are rescheduled, the new Pod get a new IP. So we need Services in order to provide a stable way to access and load-balance traffic to Pods, even if Pods come and go, making applications reliable and discoverable.