

- Overview
- OCI CLI
- Resource & Configuration Management
- Common Operational Activities
- OCI Storage Services
- Troubleshooting & Disaster Recovery
- Identity & Access Management
- Security Services
- Observability & Management
- Billing & Cost Management
- Governance & Administration
Overview #
hello
OCI CLI #
With OCI CLI, we can perform day to day tasks (fetch the compute instances running in your tenancy) with the CLI which invokes the OCI API.
OCI CLI Authentications Types #
From a local machine:
- API Keys (Not secure since they are not expire)
- Security token (Secure, since the token will expire after an hour unless refreshed)
From within OCI:
- Instance Principle (the way a compute instance can authenticate with OCI endpoints)
- Resource Principle (the way Oracle Functions can authenticate in order to communicate with OCI PaaS or IaaS)
OCI CLI Setup (API Key) #
- Install the oci-cli
- Setup an API key. In your terminal shoot the following command, and enter your User OCID and other information that can be found in the Console.
oci setup config- When the API Key is generated, open the console and head over to Identity > Users > User Detail > API Keys, and press the Add API Key button.
- Test if it works
# List all the compute instances of a compartment
oci compute instance list -c <COMPARTMENT_OCID>
OCI CLI Setup (Token Based Authn) #
- On your terminal, run the following command:
oci session authenticate- A browser login page will open as a result from the above command. Enter your credentials and head back to the terminal
- You will need to add a profile name. for example: test-profile-key
- Now, to run the previous command and list the compute instances running for a compartment:
# Run the same command but specify the profile name of the token and that you wanna use token-based authentication

oci compute instance list -c <COMPARTMENT_OCID> --profile <PROFILE_NAME> --auth security_token
OCI CLI Syntax #
oci <service> <resource> <action> <options>We can list the options for all the parameters like:
oci -h
oci <service> -h
oci <service> <resource> -h
oci <service> <resource> <action> -h
Resource & Configuration Management #
Please follow the OCI Resource Manager of my OCI DevOps Professional guide, where i describe this resource in detail.
It would be a good idea if you would first have a look in the Configuration Management (CM) & Infrastructure as Code (IaC) section.
Common Operational Activities #
Custom Compute Instances Images #
When we create a new compute instance in OCI, we can choose from many different options and the 2 that we want to focus in this section is the Image (which can be custom image or a platform image) and the boot volume.
The boot volume is the portion of the hard drive which contains the Operating System, its supporting file system, etc.
When we create a new VM or Bare Metal instance, a boot volume is created based on the image that we specified.
Within this boot volume, we can install any software or perform configurations based on the needs that the instance will perform.
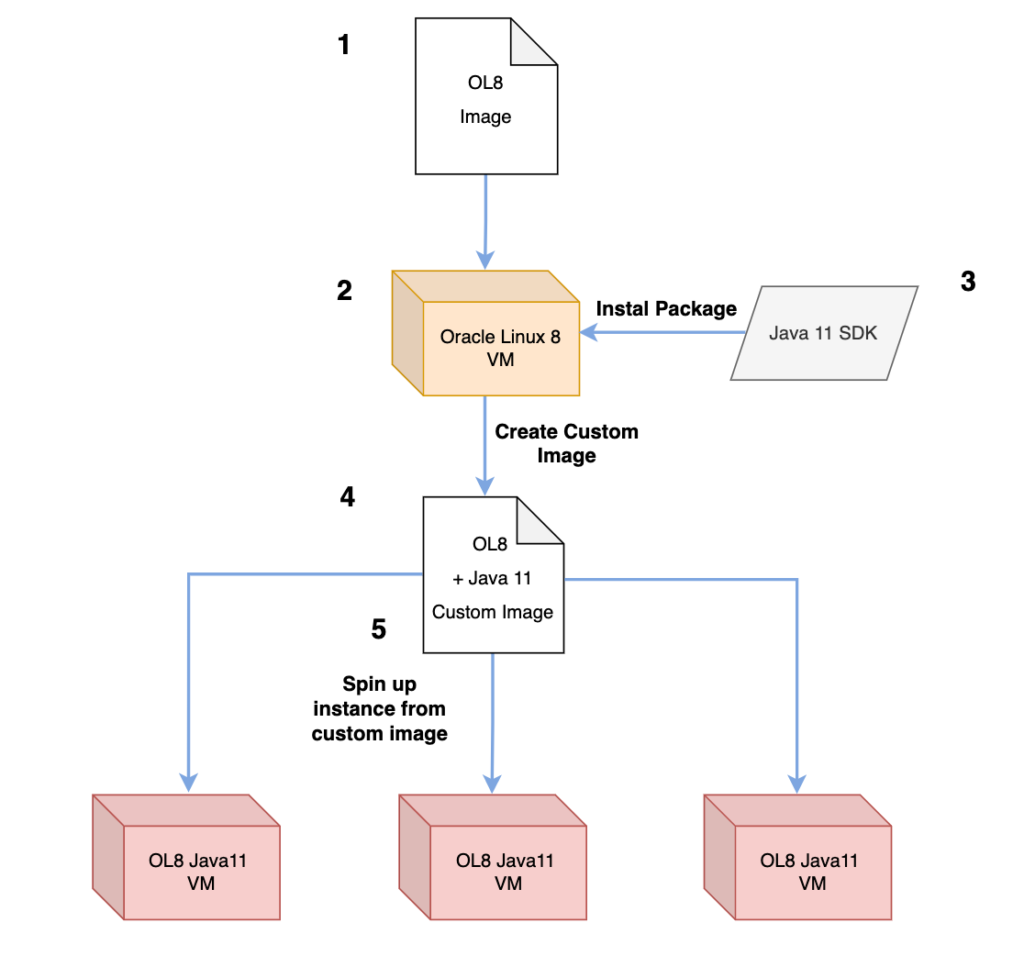
Out of this running instance, we cam create a custom image and the, create new instances based on that pre-configured image that we have created.
To visualise this, let’s assume that we need an Oracle Linux 8 Instance, with a specific Java version running in it, which our software will be dependent upon.
So we provision an OL8 VM Instance from the console, ssh into the instance and installing the desired Java version in it.
Then, from the console, from the More Options button we can create a custom image from the running instance.
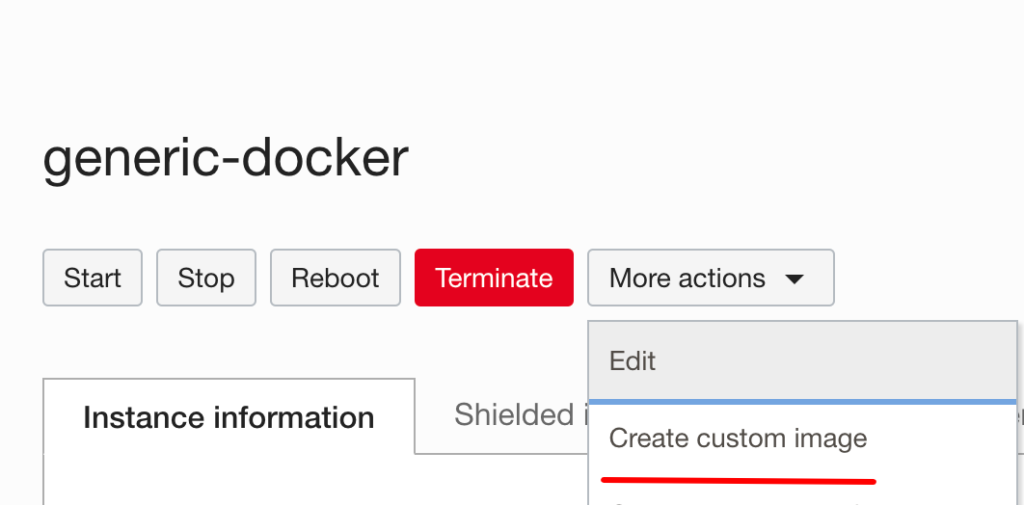
The following is to visualise the use case described above:
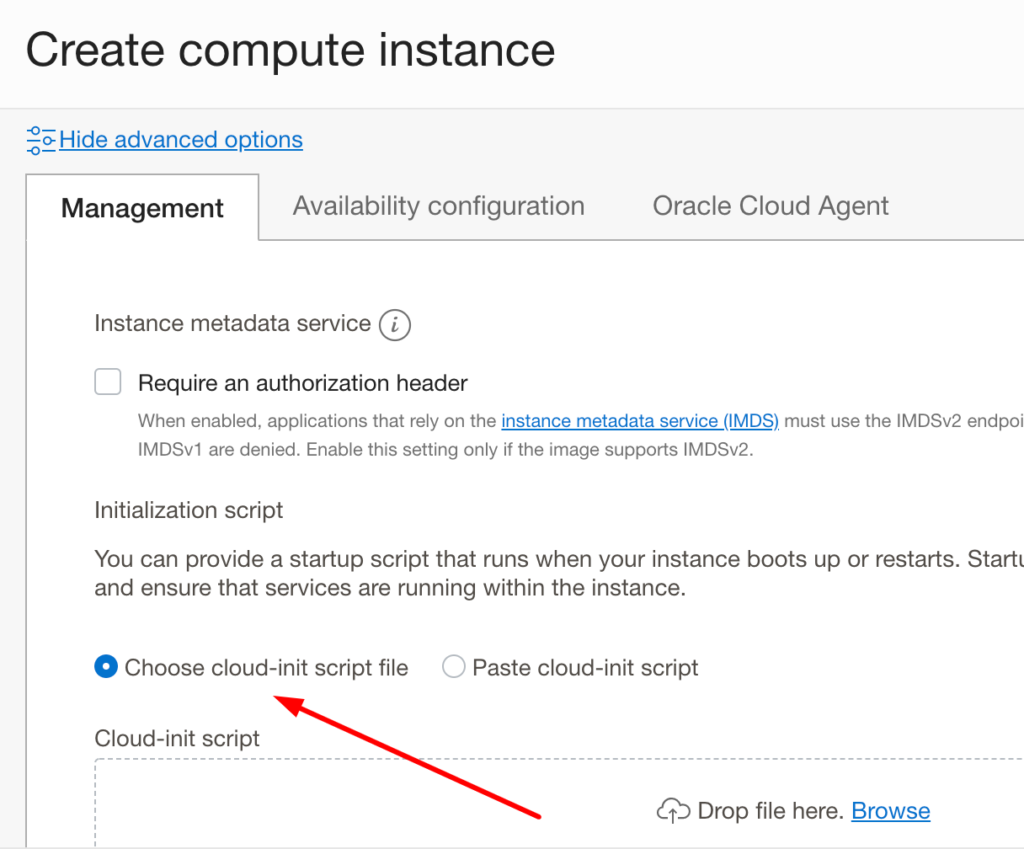
Compute Instance Initialisation Scripts #
We can run custom scripts first thing after our compute instance is created. These scripts can be things like installing important software in our VM before performing any activity on the VM.
We can add an initialisation scripts when spinning up a new instance:
Disaster Recovery for Compute Instances #
- Creating custom images, exporting them to Object Storage, importing to another region and spin up a new instance which is a copy of the first one.
- Create a Boot Volume Backup, which we can then copy it to another region and start an instance from this Backup. Keep in mind that the Boot Volume Backup is one time activity.
- Boot Volume Replicas. With Boot Volume Replicas, we can continuously get backup from one region and update a replica in another region, from where we can activate it anytime and use it as a DR node.
OS Management Service #
Let’s assume that we have a fleet of 100 compute instances, and we have a security patch to perform (for example update nginx version to the more secure one). Instead of ssh into each of the nodes one by one, we can use the OS Management Service, group the nodes, and perform automated action across all the fleet.

Reasons to use OS Management Service:
- Increase Security and Reliability
- Save Time
- Reduce Complexity
- Cost effective
Note: OSMS is used to install/update/remove yum repo software.
How to use OSMS? #
- First, you need to create an OCI Dynamic Group Policy which will
- Allow instance to use OSMS
- Allow OSMS to emit metrics
- Grant this Dynamic Group to retrieve OSMS details
- More on this: https://docs.oracle.com/en-us/iaas/os-management/osms/osms-getstarted.htm#osms-setup-policies
- Enable Oracle Cloud Agent Management (this is an option that we can enable from the console)
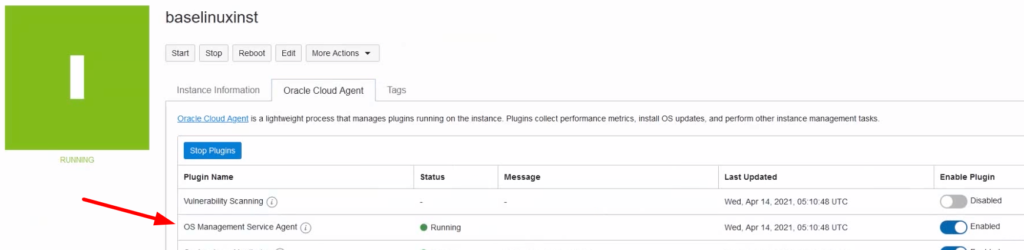
- Install OSMS agent to each node (if not enabled from the console, we can install it manually)
sudo yum install asms-agent#
OCI Load Balancer #
OCI offers Layer 4 and Layer 7 Load Balancer Service. Each comes with different Policies and configurations which will be described below.
Load Balancing Policies #
In Layer 4 Load Balancer we can have the following Policies:
- 5 Tuple Hash
- 3 Tumpe Hash
- 2 Tuple Hash
In Layer 7 Load Balancer we can:
- Decide whether or not you need to use sticky sessions. If yes, then you can choose from 2 Session Persistence options:
- Application Cookie Persistence, this is when you backend generates and sets the cookie for the sessions persistence. You need to specify the exact same cookie name to the OCI LB.
- Load Balancer Cookie Persistence, this is when you backend is unable to generate a session cookie. In this case, OCI LB generates and sets the persistence cookie.
- Use Round Robin Policy
- Use IP Hash Policy
- Use Least Connection Policy
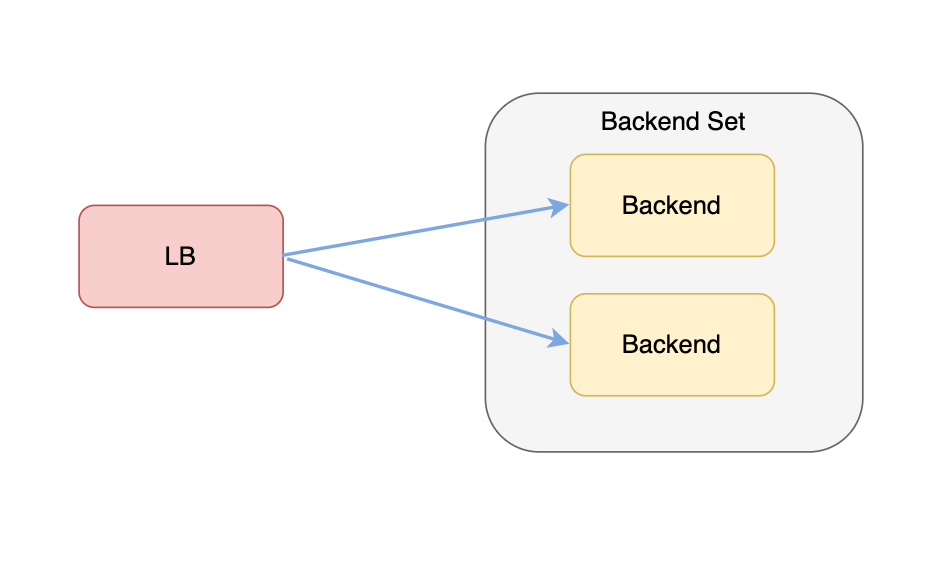
Health Checks #
With Health Checks, we can confirm the availability of the LB and its backends.
Health checks can be activated for:
- Backends
- Backend Sets
- The LB itself
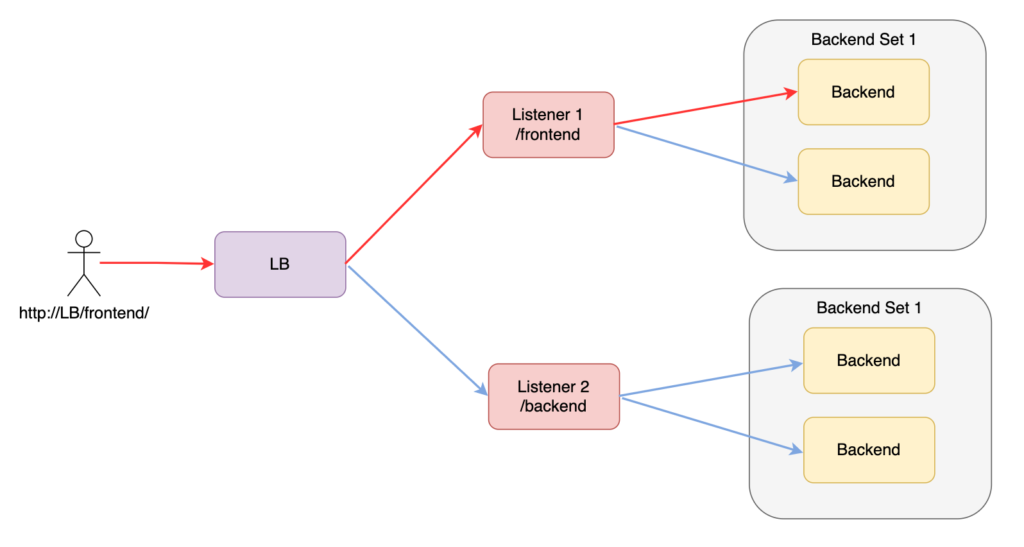
Request Routing #
The OCI LB can have multiple listeners which load balance different backend sets. For example, we can have a backend set for the front-end application and a backend set for the back-end application. To avoid random responses each time we make a request to the LB, we need to distinguish the backend sets. We can achieve that by configuring:
- Virtual Hostnames
- Path Route Rules
The following illustration will give an example of the second option
SSL Certificates #
When using the LB Service, we have 2 options where we have use SSL Encryption:
- We can use SSL between the Client and the LB
- We can use SSL between the LB and the backends
LB Metrics #
With LB Metrics we can measure:
- The number and type of connections
- The quantity of data managed by the LB
- Diagnose and troubleshoot LB and Clients issues
- Analyse the HTTP responses returned by the nodes in the backend set
Traffic Management Service #
OCI Traffic Steering is basically a DNS based load balancing mechanism. We can load balance users to the load balancer that exists in a region closer do their geographical location, or fall back to other regions if one load balancer is down. The following illustration will give a better understanding of the above said.
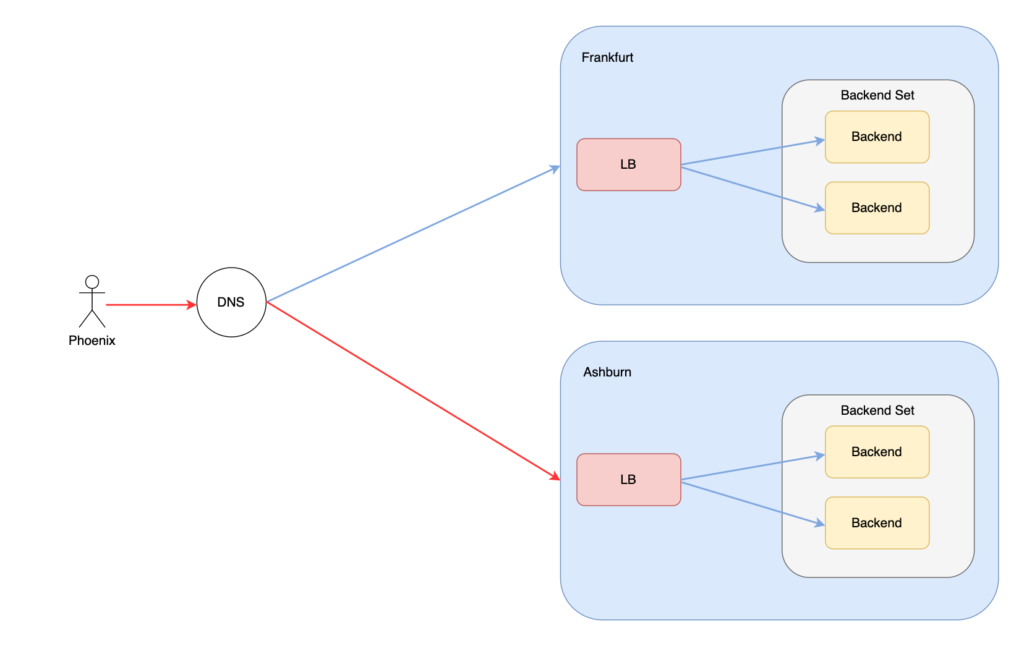
The failover with Traffic Steering Service, is accomplished by monitoring the Health Checks (either to the LB IP or the backends IPs).
You can create a Health Check, by navigating to Monitoring > Health Checks.
We can create a Traffic Management Steering Service by navigating to Networking > DNS Management > Traffic Management Steering Policies.
We can use Steering Service to accomplish:
- Failover
- Load Balancing
- Geolocation Steering
- ASN Steering
- IP Prefix Steering
by creating Answer Pools (For example Answer Pool A would be the Application in Region A, and Answer Pool B would be the Application running in Region B), and attach the IP of the applications (it can be the LB IP in Region A and B).
The advantage of creating Health Checks as described above, is that we can attach these Health Checks to the Steering Policy and achieve failover based on the status of the health check of a region.
OCI Storage Services #
Block Storage #
Block Storage Service is Availability Domain specific. This means, that the Block Volume is attached to compute instance running in the same AD with the AD that the Block Volume exists. In case of this specific AD outage, the Block Volume is also, unavailable. The Block Storage is getting care of making replicas within the same AD.
Backups and Backup Policies #
We can take Backups of a Block Volume instance. This Backup is stored in the Objects Storage of the Region that the Block Volume exists, so the BV Backup can be replicated to other Region’s Objects Storage and create new compute instances from these backups. Please keep in mind that in order to take a full backup of the running instance, a Boot Volume backup has to be taken along with Block Volume. From the Block and Boot Volumes that are now backed up in the Object Storage, we can provision new instances.
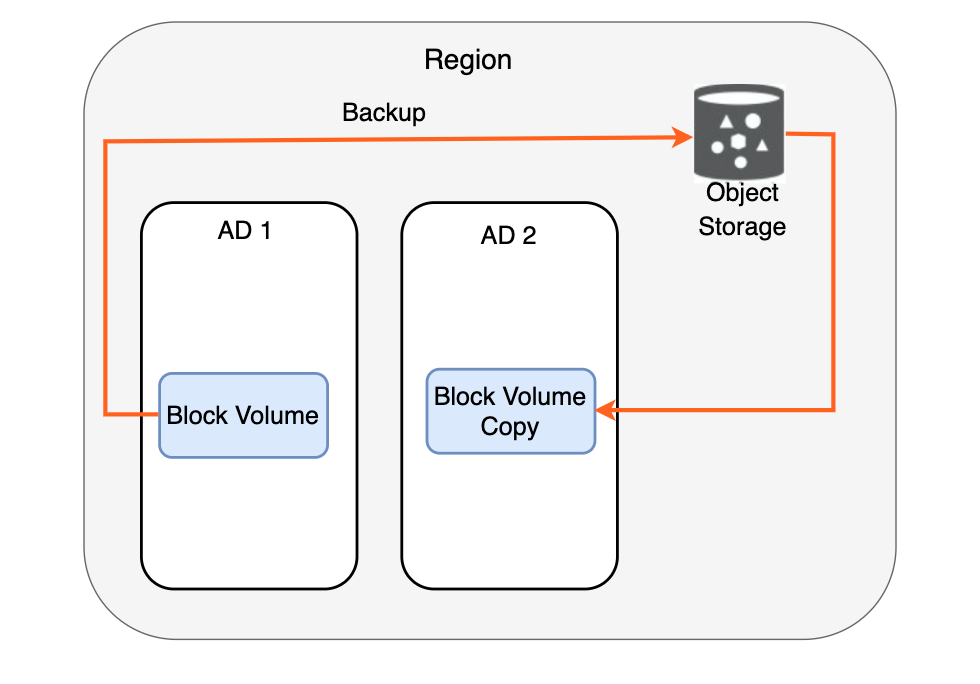
A backup can be done manually, and as already mentioned, this backup will automatically be stored in the regional Object Storage.
In addition, we can copy the Block Volume Backup to a different Region.
There are 3 backup policies available. Bronze (monthly automatic backups), Silver (weekly automatic backups) and Gold (daily automatic backups). We can also create custom backup policies.
Block Volume Clone #
We can clone a specific Boot Volume instance. This clone, will be an exact point in time copy of the source Block Volume and it will be created in the same AD with the source BV. All the data of the source BV will be copied in the clone Block Volume, but after the clone is available, newly generated data from the source will not be available in the clone.
The same is true with the Boot Volumes. If we create a clone for a specific Boot Volume, we can then, within the same AD, create new Compute Instances and choose as custom image, the cloned Boot Volume.
Volume Groups #
We talked about taking backups for Boot and Block Volumes in the above sections and that we can use them as DR mechanism in order to spin up exact copies of compute instances running in a region.
Taking backups from all the volumes attached to one instance can be chaotic, so we can create volume groups in order to group the boot and all the attached block volumes, and then create backups upon these groups.
In order to create a new Volume Group, navigate to Menu > Block Volumes > Volume Groups, choose the Boot and Block Volumes and hit Create Volume Group.
Volume Replication #
When creating a new Block Volume, we have the option to enable cross-region replication of the volume, by choosing the region in which the volume will be replicated.
By default, the replica volume is not activated, until we manually enable it.
This option adding additional cost.
File Storage #
When we create a File Storage, a mounting target is also created
We can attach the mounting target to multiple compute instances, across different ADs or outside the VCN that the mounting target is created. The mounting target is a network endpoint provisioned the VCN.
In order to mount an FS in a compute instance, we need to make sure that the egress and ingress rules are correctly configured. All the details that we need can be found in the FS option menu:

On top of that, FS provides snapshot functionality and exporting mechanisms. Export controls how NFS clients access file systems.
Object Storage #
Object storage can be access through internet (unless restriction will be applied), by using the Browser Console, API’s or OCI CLI. When we work with Object Storage, we create buckets, which are entities that organise the data that we want to upload.
Buckets #
Bucket names are unique per region, since the URL that we can upload/download objects contain the bucket name in it.
In Object Storage, we have Storage Tiers. Storage Tiers split into 3 categories:
- Standard (Frequently and fast access)
- Infrequent (Accessing but not as fast as Standard option)
- Archive (Data that will be access rarely and can’t be accessed unless first moved to the Standard tier storage).
Pre-Authenticated Requests #
As a general rule of thumb, it is a bad practice to have buckets with public access. What we can do in order to control who and for how long will have access to a particular object or entire bucket while keeping the bucket private, we can create a PAR URL and share it. We will be also available to remove this PAR anytime from the console.
Object Live Cycle Policies #
Object Lifecycle Policies can be useful in situations when, for example we want to persist a newly uploaded object to the standard tier for the first 100 days since it was uploaded, and then move it to the Archive Tier for the next 200 days, and eventually to be automatically deleted.
We can create such policies under Menu > Object Storage > Bucket Details > Lifecycle Policy Rules. In order to make that work, we first need to create an IAM Policy to allow Object Storage manage these objects and follow the rules.
Multi-part upload #
When uploading a large file to Object Storage from the Console, behind the scenes, the file is beak into multiples pieces and each piece is uploaded individually. This way, we can avoid uploading the entire file again if a network failure happens, maintaining good data resiliency. The same thing can be achieved with Object Storage REST APIs.
Cross-regional Object Replication #
To ensure data is replicated across multiple regions (that you choose), we need to create an IAM replication policy first, under Menu > Object Storage > Bucket Detail > Replication Policy.
Troubleshooting & Disaster Recovery #
Compute SSH Connections #
When a new compute instance is provisioned, the password authentication is disabled, since the key authentication is a lot more secure and the default opc user is created.
The client need to have the private key in order to connect to the compute instance via SSH.
In the server side , each user should have the public key under its .ssh directory. We can verify this by printing the key:
cat .shh/authorized_keysCompute Instance Troubleshooting #
We have various ways to troubleshoot a non responding compute instance, which we will discuss next.
Using Console Connections #
When we boot a machine which we are physically present during this process, we are able to see various messages on the monitor during the boot time.
On the other hand, when we boot a new compute instance in the cloud, we are not able to see any messages during the boot time. This is where console connection comes handy.
We can create a new Console Connection for a specific instance, by heading over the Console Connection option under the Resources menu.
Using Diagnostic Interrupts #
A diagnostic interrupt forces the instance to crash and reboot. Before sending a diagnostic interrupt, you must configure the OS to generate a crash dump (memory dump file) when it crashes and be able to observe the reason of system failure on the next login.
Diagnostic Interrupts are dangerous since they can cause data corruption to a live system.
With Detach and Attach Boot Volume #
There is another option to troubleshoot an unresponsive compute instance. You can stop the problematic instance from the console, detach the boot volume form it and then, on another healthy instance which is running in the same Region and AD, attach the boot volume as a block volume. This way you can perform system diagnose on the problematic’s instance boot volume from the healthy instance.
Load Balancer Troubleshooting #
Here are some of the reasons that can be the cause of corrupted LB heath status:
- Health check port, path or protocol can be misconfigured
- Misconfigured listener setting. For example the LB listener corresponds to the appropriate backend set
- A security rule might be misconfigured
- The VCN might block traffic from misconfigured security list or or security groups
- The compute instance that are backends sets for a LB listener, might have misconfigured route tables
LB Health Check Status:
- OK
- INVALID_STATUS_CODE
- TIMED_OUT
- CONNECT_FAILED
- IO_ERROR
- OFFLINE
- UNKNOWN
Block Storage Troubleshooting #
Recovering Data from Block Storage #
The following, is a case of compute or OS related failure and not block volume failure data recovery.
We can recover our application block volume data by performing the following steps:
- detach the block volume form the problematic instance
- backup the block volume
- spin up new volumes from the backup
- attach the new volumes to a new instance
- mount the volume and access the data
Troubleshoot Share Block Volumes #
As we already know, we can attach a single block volume with multiple instances, if the instances are running on the same AD with the BV.
There are some common errors when trying to attach a BV to multiple instances:
- All volume attachments must be configured as sharable
- The number of instances where we can mount the same BV. (currently 8 compute instances)
- Read/Write conflict. If we attach a BV already on read/write mode, we will never be able to attach it on a different instance
Boot Volume Resizing #
Here are some key points to consider when trying to resize a BV:
- When resizing a BV, keep in mind that we only can increase the size and not decrease it
- When a BV has cross region replication, we cannot resize the BV
- We cannot resize a volume if an ongoing BV clone or resize is ongoing
- We cannot resize a volume if a backup is pending
Troubleshooting OCI File Storage Service #
- Make sure that for each FS there is a mount target created with the appropriate egress and ingress rules in the subnet that the mount target is created
- need to have the appropriate client software installed (nfs-utils)
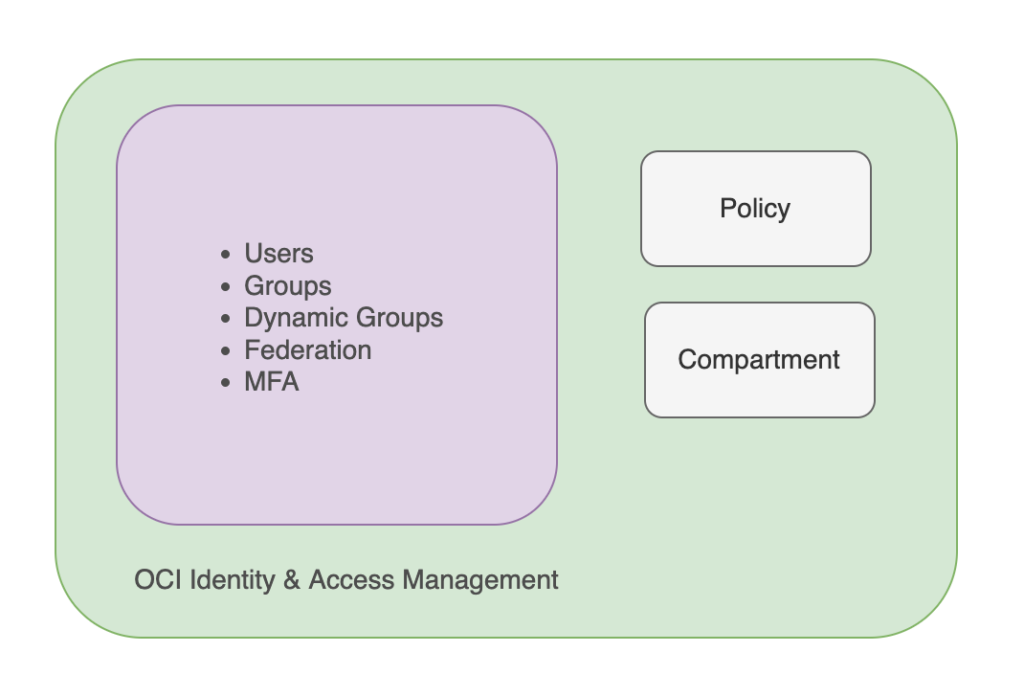
Identity & Access Management #

AuthN #
User access to a domain.
AuthZ #
What the user can have access to. For example, if UserA is member of GroupA, and GroupA have no permissions to access users management, the UserA won’t be able to add a new user to the domain that he exists. These permissions are managed with Policies. Policies are written in a human understandable format, and they allow users, of principles (services) to access other services.
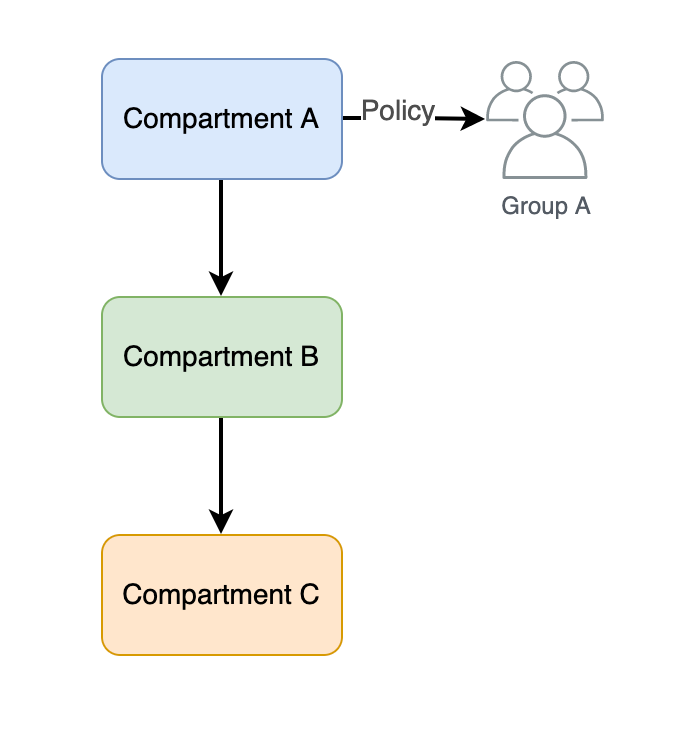
Compartments #
A compartment is a logical construct of various resources. We can create a new Compartment and add Resources to that compartment in order to isolate them.
Giving access to that compartment would be creating a Policy against a Group and allow access to the Compartment of choice.
One important detail to remember is that even if a service belongs to a single compartment, it doesn’t mean that it can’t communicate with a resource which belongs to a different compartment.
It is also worth mentioning, that resources from different regions can be part of the same compartment.
There is also the possibility of creating Nested Compartments, which allows us to create a hierarchy of compartments, and each compartment would be a team of an organisation.
We can control budgets and quotas (what resources or image shapes can a compartment have access to).
Policies #
Policy Inheritance
The idea is that if Group A have permissions to manage Network Resources in Compartment A, Group A will have permissions to manage Network Resources in Compartment B, since Compartment B is a child of Compartment A.
The other way around doesn’t work.
We can have:
- conditional based policies
- tag based policies (for tags that are attached for a group, d-group or a compartment)
Federation #
Oracle provides federation with Oracle IDCS, Microsoft Active Directory and any other provider that supports SAML 2.0 protocol.
Identity Domains #
Security Services #
Infrastructure Protection #
- DDOS Protection
- Web Application Firewall (Layer 7 DDoS)
- Security Lists (Network Security Groups)
- Network Virtual Appliance
Identity & Access Management #
As described in the previous chapter.
OS & Workload Protection #
- Shielded Instances
- Bastions
- Dedicated Hosts
- OS Management
Data Protection #
- Vault Key Management
- Vault Secrets Management
- Data Safe
- Certificates
Detection & Remediation #
- Cloud Guard
- Security Zones
- Security Advisor
- Vulnerability Scanning
Cloud Guard #
Cloud Guard service helps us:
- Examine targets (gives a security score for a compartment that we choose to monitor)
- Detect problems (misconfigurations or security problems)
- Applies response and recommendations (guidelines to fix the issues detected or correlate issues)
It also provides visibility into specific non-complaint OCI Benchmarks.
Cloud Guard requires to have all necessary IAM Policies for each tenancy resource that it will perform security checks.
These IAM Policies are automatically created when enabling Cloud Guard from the OCI Console.

Enabling Cloud Guard
- First, we need to select a Region and a compartment that we want to monitor
- We need to choose a Configuration Detector Recipe
- We choose Activity Responder Recipe.
Think of Detector Recipes as a collection of rules.
Cloud Guard Concepts
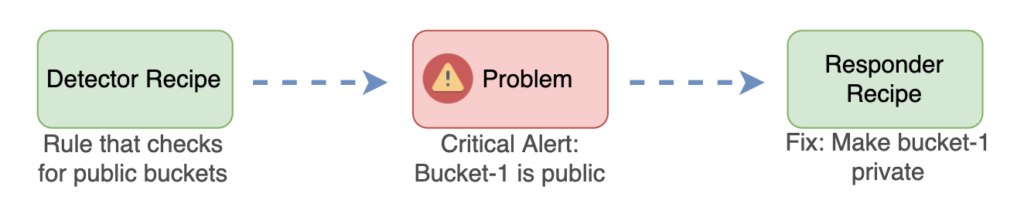
- Cloud Guard Problems: When an issue is detected, this issue is the Cloud Guard Problem, which fires an alert or trigger an event. Then, when event is triggered, we can send a notification or we can write an OCI Function to automatically remediate the problem (make bucket-1 private). Apart from that, a Cloud Guard Operator (physical entity, an engineer) can manually approve this remediation and a Cloud Guard Responder, manually fixes the issue.
A problem has a dedicated page in OCI Console which describes the problem details. - Cloud Guard Detector Recipes: Think of them as a set of rules (as shown in the diagram above. buckets must be private). When applying a Detector Rule on a Compartment, all the Compartments with lower hierarchy will be listening to this rule. If a different Detector Recipe is applied on a lower level hierarchy Compartment, this rule will override the rule of the higher Compartment.
- Cloud Guard Responder Recipes: It is a set of responder rules, which defines specific actions (send notification or remediate problem) to the problems that Detectors have identified. Before executing any action we can configure Responder Rule to ask first if it is possible to remediate the problem, or we can set it to execute actions automatically. When a Responder executes an action, the history and the results of this action is logged in the Responder Activity.
- Cloud Guard Notifications: The Notification Cloud Guard Responder Event can send a Problem detected to the OCI Events Service, and as already discussed, handle the actions from there.
Security Zones & Security Advisor #
A security zone is associated with a Compartment. We write Security Zone Recipes which is a list of rules (subnets must be private), and can be applied currently for Network, Storage, Compute and Database OCI Services.
Security Advisor is a service that helps us with workflows in order to create compliant instances of the Network, Storage, Database and Compute services. It is not mandatory to use Security Zones Service in order to use Security Advisor Service. Security Advisor is useful when we cannot for example create a secure block storage instance and the service is showing an error related to a security configuration that must be first handled. In that case we can go to the Security Advisor and see examples of how to correctly setup a service, step by step.
Encryption Basics #
I suggest to read the Symmetric vs Asymmetric Key Encryption chapter of the Understanding HTTPS and SSL Certificate article.
Well mentioned term: HSM (Hardware Security Module), is a physical computing device.
OCI Vault #
OCI Vault helps us to centrally manage encryption keys and secret credentials.
We can have Virtual Private Vaults, which have better isolation of kets/secrets, and can be backed up. We can also have Vaults in shared partition, which shares same partition with many tenants and it is still secure but it cannot be backed up.
Keys are logical entities which contain cryptographic material and we can use these keys to encryption or digital signing.
Vault support 3 types of keys:
- Master encryption keys. They are used to generate Data Encryption Keys. We can store MEK’s in HSM or in Software (stored in a server)
- Data encryption keys. They are used to encrypt data. Data Encryption Keys are encrypted with Master Encryption Keys, known as envelop encryption.
- Wrapping keys. If we want to import keys to a Vault, we need to wrap them with the public wrapping key and the Vault will unwrap if, so that makes the transfer more secure.
Import & Export Keys
We can import our own keys and as we discussed they will be wrapped with a public key on transport for better security.
We can export keys for example if we want to perform cryptographic operation on the client instead of using the vault. But to do that we need to generated our own RSA key, wrap the keys before exporting it and then unwrap it in order to use it. These operations are only available through OCI Console.
Integrating Vault with OCI Services
We can use vault with various OCI Services to encrypt and decrypt data.
We can use Oracle-managed keys to encrypt data in OCI services, and it is actually enabled by default. We can alternatively use Customer-managed keys, for which we will have to create Vault and self mange keys.
Backup
- Only Virtual Private Vaults can be backed up
- Only Master Encryption Key of HSM protection can be part of backup
- Vault Service encrypts the backup and only the Service can decrypt this backup
- A key must be associated with a Vault before it can be restored
Replicate Vaults & Keys
- Vault cross regional replication can help on disaster recovery scenarios
- Only Virtual Private Vault can be replicated
- Everything is synchronised automatically between the replicated Vaults
Vault Secrets
Instead of storing usernames and passwords in plain text or configuration files, we can use Vault Secrets for that.
We can create Secrets using CLI, console or API. Secrets can be rotated in order to avoid scenarios where they are compromised.
Bastion #
In order to connect into a Compute Instance that is living in a private subnet (not accessible from internet) from the internet, we have 2 options to do that:
- To create a custom bastion instance, where traffic from internet is allowed and the bastion instance can talk to the instance that is living in the private subnet
- To use the OCI Bastion Service. Using OCI Bastion Service we can limit the incoming IP’s that are going to connect to the Bastion using CIDR blocks, or even limit the number of only 1 IP that can connect to this Bastion. The Bastion service is FREE, and it is fully managed by Oracle. Bastion can be configured to be in the same Private Subnet with the services that we want to connect to, or in a different private subnet.
When creating a new compute instance that is going to be accessed from an OCI Bastion, dont forget to check the Bastion Agent option when creating the instance.

WAF (Web Application Firewall) #
The WAF is a solution that helps protect websites. It filter, monitor and block HTTP/S traffic. It protects from SQL Injections, XSS and DDoS attacks. The Web Application that the WAF will protect does not need to be hosted in OCI. It can be on premisses or both.
WAF Components
WAF Policy: Web application firewall policies encompass the overall configuration of your Web Application Firewall service, including access rules, rate limiting rules, and protection rules.
WAF Origin: The app’s host server and must be setup in WAF Policy in order to write protection rules for that origin. This can be OCI Load Balancer IP’s.
WAF Protection Rules: Can configure to block/allow or log network traffic.
WAF Bot Management: Allows to detect bot traffic to the website and either allows or blocks traffic. It enables various challenges like CAPTCHA to access the website.
Access Control: Allows to explicitly define actions for request that meed specific conditions
Caching Rules: Determines if the requested content must be cached
Vulnerability Scanning #
VSS (Vulnerability Scanning Service) is used to constantly check for a specific compartment instances vulnerabilities and issues. These reports can also be integrated with Cloud Guard to identify them as problems.
TLS Certificates & CA’s #
I recommend you to read the Chapters Certificate Authority & SSL/TLS Certificates of my UNDERSTANDING HTTPS AND SSL CERTIFICATES article.
From the console you can create a certificate, a public one or a private one and then use these certificates for your web apps or load balancers.
Observability & Management #
Services:
- Monitoring
- Logging
- Event Services
- Logging Analytics
- Application Performance Monitoring
- Database Management
- Operation Insights
OCI Monitoring #
We can use monitoring metrics for almost all OCI Services and create alarms upon these. We can access these metrics and alarm using console, CLI ad well as API. Another benefit is that we can use metrics to create global visibility dashboards related to our infrastructure health.

OCI Notification Service #
The Notification Service uses a publish-subscribe pattern, and each subscriber can subscribe to a notification topic (topic is a communication channel to send notifications). If a notification fails to be delivered the notification service will retry to send the notification again.
A subscription (a receiver of a notification) to a topic can be an email, Function, PagerDuty, Slack SMS or any other HTTPS web-hook.
OCI Logging Service #
Fully managed single pane of glass for all logs. It can be logs from OCI or outside OCI (Service Logs or Custom Logs).
We can collect logs using Logging Service and then write then perform actions like triggering a Function or an Event.
Logging Service Terms:
Logging Groups: Logical containers to group logs. We can search for logs that are all in group and create actions for groups. Groups can be used to limit access to logs by writing Policies for Logging Groups.
Service Logs Categories: OCI Load Balancer logs that gives us ERROR logs
Billing & Cost Management #
Cost Analysis #
We can analyse costs by start & end date, grouping dimensions (for example costs for the entire tenancy grouped by compartment costs), filters (check costs for a compartment with the name “Dev”), forecast (see what will be the total bill by the end of the month)
Compute Pricing Considerations #
We need to consider Image Shape (Processor Type etc), Size (OCPU physical compute cores), Time that the instance will be up and running, capacity type and/or OS License.
We can optimise Compute Costs by using auto-scaling mechanisms to save costs. Monitoring service can provide us metrics related to network traffic and compute instances will be automatically scaled in or out when needed.
Block Storage Considerations #
Major considerations are Size (how much space do you need) and Performance (how fast you want to access these data). We can use auto-tuned performance to optimise the costs.
Block Storage Considerations #
We need to consider the Object Storage Tiers (Standard, Infrequent, Archive), Storage (per GB / month), Transactions (number of requests / month). We can optimise costs by creating Lifecycle Rules or use Auto-tiering
Network Considerations #
Ingress traffic is FREE. However, egress is up to 10GB/month is Free.
Governance & Administration #
Service Limits #
Service limits are Oracle set limits on resource usage (for example only 50 VCN per region), but we can easily request for increasing limit from the console.
Quotas #
On the contrary, Quotas are administrator-set limits on resources. That means that we as users in OCI can set limits on our services per compartment.
set compute-core quota standard-4-core-count to 40 in compartment MyCompartmentCloud Advisor #
Cloud advisor is a service that gives recommendations for Cost Management, Performance and High Availability. It is similar to Cloud Guard with the difference that Cloud Guard gives recommendations about Security.
Cloud Advisor is not enabled by default, we need to go though Cloud Advisor settings and enable it. Cloud Advisor is a Free Service.
Multi-tenancy Architecture & Organisation Management #
We can have multiple tenancies and map them to one parent tenancy, creating this way a hierarchy of tenancy that helps us achieve Data Isolation, Ease of Consolidating Billing, Separate Security & Cost Management.
Tho breaking up things to multiple tenancies instead of using compartments that also provides a very good level of isolation, can bring a Management overhead.
/*54745756836*/

