

What you should know #
I initially created this cheatsheet guide as a personal reference while preparing for the OCI Developer Professional exam. However i think that more people might benefit and reference this guide before and/or after taking the exam.
I would like to point out that i am personally preparing for the exam with the help of Oracle Learning Path exclusively, and i am suggesting for you to take the time and the effort to enroll and complete the full preparation path created by the experts at Oracle Learning, in order to leverage the full dimension knowledge of the specific topic.
Exam Topics #
- Container-based application development with the help of OCIR (Oracle Cloud Image Registry)
- Cloud native DevOps methodologies with OKE (Oracle Kubernetes Engine)
- Serverless Functions and API Gateway
- OCI Streaming and Event services
- Cloud native applications testing strategies
- Monitoring and Troubleshooting cloud nate applications
Please note that this is only a cheatsheet. There are no examples or hands on provided in this guide.
Oracle Learning Path provides an amazing hand-on workshop which helps you master all the topics mentioned above.
About Cloud Native #
OCI Cloud Native Servies gives the developer standard ways to build, deploy and managing cloud native apps. These are loosely couped microservices that are running in lightweight containers and communicated with each other through API’s which are managed in high automated DevOps capabilities.
Here are some key benefits of using Cloud Native:
- Developers can focus on the client needs and make frequent changes to the sofware which is running in the cloud pipeline, delivering faster solutions
- Significant cost reduce, since the capital expenditure (huge amount of infrastructure investment) converts to operational expenditure (pay-as-you-go services)
- Automatic provisioning, autoscaling and much more useful services results to minimising chances of failures
- DevSecOps, MFA, limiting access and such more security features are one of the most important reasons of using cloud and cloud native applications.
Cloud Native VS Cloud Enabled VS Cloud Based Applications #
- Cloud Native are applications that are designed in the cloud from the beginning
- Cloud Enabled are mainly applications that was initially designed in a monolythic way, which then moved to the cloud. These systems are not scaling easily and struggling to take full advantage of the cloud shared services
- This is the middle groupd of the Cloud-native and the cloud-enabled applications. These systems aim to use some of the features of the cloud native applications like scalability but are not planned to use other cloud features.
Some differences between Cloud Native and Cloud Enabled Apps
| Cloud Native | Cloud Based |
| Built and deployed in the cloud | Built on premises but then configured to be accessed from the cloud |
| Hosted in multi-tenant instances | Not able to have multi-tenant instances |
| Applications are upgrading without disruption | They need to be manually upgraded causing disruptions and shutdowns |
| Cheaper | Costlier |
| Faster to deploy | Slower to deploy |
What is CNCF? #
Cloud Native Computing Foundation is an open-source software foundation which is making the cloud-native computing universal so every developer can have the flexibility to build and deploy his applications anywhere he/she wants, avoiding the risk of cloud vendor locking.
It is worth to mention that Oracle Cloud is a Platinum member of CNCF
Key Pillars of Cloud Native Development #
- Microservices
- Containers
- DevOps
- CI/CD
- Service Mesh
Cloud Native Development Challenges #
- Complex Architecture
- Difficult to follow up latest technologies
- Continuous Innovation
- Avoiding over-dependent to a cloud platform or provider
- It is difficult to hire developers which have the full stack cloud native development skills
- Using microservices which are many moving parts, it is harder to maintain best security practices
- Optimising operational costs
Monolithic VS Microservices Architecture #
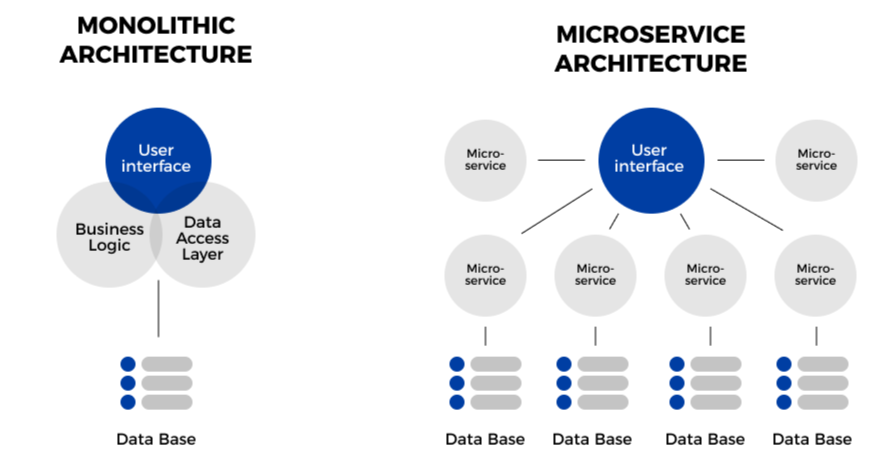
When one part of the monolithic applications fails, the entire application goes down, while when having each microservice being responsible for one task of the business logic, even if one microservice goes down the application is still running giving the user the ability to perform other tasks.
| Microservices | Monolithic |
| Loosely coupled services | A single unit application |
| Reusable components | Logic isolated to a single application |
| Multilingual | Usually the entire app is written in a single language |
| Independent deployment | Need to re-deploy the entiner application |
| Distributed data management | Centralized data managelement |
| Easier maintenance | Harder maintenance |
| Each microservice can be scaled independently | The entire application must be scaled |
Microservices Design Methodologies #
One of the most beneficial methods of designing microservices is the 12-factor app.
Container-based Application Development #
Docker is an open-source project and a containerization platform. It is lightweight, portable and secure.
Docker helps in packaging applications and their dependencies into containers, which share the same OS kernel.
Docker allows us to containerize our microservices and make it simple to manage new releases and version controlling.
In this guide we will not get deep into the Docker specific components and commands but only how to use Docker in the OCI with the help of OCIR.
OCIR Introduction #
It is a highly available, public or private docker registry, running as a fully managed service on OCI.
Terminology #
Region key: us-phoenix-1.ocir.io
Repository name: project01/foo-bar-repo
Tenancy namespace: For example the namespace of the foo-bar tenancy can be dkghasww1
Registry identifier: <region-key>.ocir.io/<tenancy-namespace>
Image path: <region-key>.ocir.io.<tenancy-namespace>/<repo-name>:<tag>
Managing OCIR #
Creating a registry #
In your console, from the hamburger menu, browse to Developer Service and and then Container Registry.
Select the Compartment in which you wish to create the the Registry, and press the Create Repository button.
Push an Image to OCIR #
- We first need to generate an access token.
From the Profile menu, in User Settings and in the Resources tab click on the Auth Tokens. - The next step is to login to the OCIR.
docker login <region-key>.ocir.io //Use the generated auth token as a password- Then, we need to tag our image
docker tag my-demo-app:v1 <region-key>.ocir.io/<compartment>/<repository>:v1- push the full image path to the OCIR
DevOps with Managed Kubernetes #
OCI Functions and API Management #
OCI Functions (Functions-as-a-Service) is a secure, container native and fully OCI integrated service based on the open source FN Project.
Oracle Functions are:
- pay per use (not for idle time)
- autonomous (No servers management, autoscaled)
- event-driven (Oracle Cloud triggers to run the code)
How do they work?
- We are writing our function code through function CLI, and our code is packed as a Docker image and deployed to OCIR.
- We configure a function trigger (when we want to execute the function).
- The code runs only when triggered, for example an HTTP request.
Pricing:
- FREE: 2 million requests / month | 0.20$ per million requests thereafter.
- FREE: 400,000 GB-seconds resource usage per month | 0.00001417$ per GB-seconds thereafter
Integrations:
- A function can be triggered through API Gateway, Events Service etc.
- When the function is triggered, the image is automatically pulled from OCIR and the function container is started.
- In the function code we can use other services like Object Storage, Secrets, Compute, Network etc.
- We can send the logs generated with a streaming service to OCI Monitoring
Triggers #
Events service allows us to keep an eye on different actions that are performed in the tenancy, for example when a new bucket is created, generate an alert or maybe trigger a function. Events in general are used in order to define rules based on these actions.
Some words about API Gateway #
API Gateway gives us the ability to Authorize, throttle and route requests to protect our backend services.
API Gateway is a serverless network-attached platform, fully managed by OCI and we can create RESTfull serverless API backend services by using OCI Functions. It can be integrated with authorization provider which generates a JWT.
Functions Use Cases #
Enforce corporate security policies #
OCI Resources (Compute, Object Storage, etc.) emit change event logs via Audit logs. We can have access to these logs using Functions, with the help of the Service Connector service. Within the FN code, we can tear down all the non-compliant resources and perform actions like shutdown compute instance, and much more.
Ingest Access logs in Security Incident Management #
We can use Service Connector with OCI Resource logging as a source and a function as a destination and push logs to an incident management tool like ELK or Splunk.
Resize Virtual Machines #
We can have a VM instance of share 1. While the VM is monitored by the OCI Monitoring Service we can generate alerts for high memory usage and other VM related alerts. When the the alarm stops, we can send this message to a Notification Topic. We can have a function which is subscribed to this Notification Topic, and in the function we can change the compute instance shape from VM.1 to VM.2.
Functions as API Backends #

Functions Concepts #
Fn CLI #
With Fn CLI we can use commands that manage functions like build and package function code as a container image and push to OCIR.
fn deployWe can also generate boilerplate functions code in any given language.
fn init <java>Functions Configuration #
As Fn users we have control of the Fn Memory, Fn Timeout (max 5 minutes), the Fn Environment Variables (DB username and password) and the Fn Service limits (number of Applications, number of Fn’s etc.).
Functions Observability #
Functions can:
- send metrics to the OCI Monitoring Service.
- send logs to the OCI Logging Service or a 3rd party service.
- generate and send traces to the Application Performance Monitoring Service.
- troubleshoot errors
Functions Quickstart #
1) Setup your tenancy #
- From the burger menu, go to Identity & Security
- Click the Domain, and verify your user
- Next go to Groups and create a new Group, adding the necessary users to that group
Next, create a compartment
- Identity & Security, and browse to Compartments
- Click Add Compartment and create the new compartment
- You can create a compartment policy by relating the groups that you created
2) Create a new Application #
- From the burger menu, navigate to Developer Services and select Applications
- From the left side choose your Compartment and click the Create Applications button
3) Setup the Cloud Shell env #
After creating the new application, there will be a getting starter section that you can follow.
First you can check the context of your application and change it to you region context
fn list context
fn use context <region-name>
Configure the function project context with the compartment OCID
fn update context oracle.compartment-id <compartment-ocid>Next, update the function context registry
fn update context registry <region-key>.ocir.io/<tenancy-namespace>/repositoryNext, generate an Auth Token like described in the OCIR Introduction section, and login to the OCIR that you have created.
fn list apps4) Create, deploy and invoke the OCI Funciton #
fn init --runtime java hello-world //create a new function with boilerplate java code

cd hello-world

fn -v deploy --app helloworld-app // builds and push the FN image to OCIR

fn invoke helloworld-app hello-java
5) Adding a custom image #
- Add a custom Dockerfile
- run the following command
fn -v buildAPI Gateway #
Network and Security #
API Gateway is a Network attached device. So before creating an API Gateway we first need to create a VCN.
Create a VCN #
- From the burger menu, go to Networking and choose Virtual Cloud Networks
- Make sure that you select the appropriate Compartment
- Click the “Start VCN Wizard“.
- Give a Name to the new NCV.
When the VCN is created, we can see that we have 2 subnets created for us. A public and a private. API Gateway can work with public either with private subnet. It depends on the use case.
We can also see that a lot of Resources have been created along with our VCN. For examples the NAT Gateways, the Internet Gateways, etc.
One of the most important things to configure before creating our API Gateway, is to configure Security Lists Resource.
OCI is secure by design, so there is only port 22 available for SSH remote login.
Add TCP Ingress Rule #
- To to Security Lists from the left side Resources menu
- Select the Default Security Lists option
- Click the Add Ingress Rules button
- Recourse type: CIDR, Source CIDR: 0.0.0.0/0 (allow everything from the internet), Protocol: TCP, Destination Port Range: 443 (API Gateway allows only HTTPS traffic in)
Create Policy #
We will create a Policy in order to allow APIGW to call Functions.
From the burger menu, select Identity and Security and then Policies. Add the following new rule:
Allow any-user <group-name> to use functions-family in compartment <compartment-name> where ALL {request.principal.type = 'APIGateway', request.resource.compartment.id = '< gateway compartment-ocid>'}Create an API Gateway #
New we are ready to create the API Gateway:
- From the menu, go to Developer Services
- Under the API Management select Gateways
- Ensure that you are at the correct Compartment
- Click Create Gateway
- Select the VCN that we created above
Creating an API #
In this example we will use an API Definition and use it as a mock deployment.
Prototyping an API is a way of providing the front-end team example response of the API while the back-end team is working to implement the web service. Serving this with API Gateway is also useful to test the API and validate that it is meeting the requirements for the project.
To create an API Prototype:
1. Create an OpenAPI description. You can use the Swagger Editor for that.
2. From the burger menu, select Developer Services and under the API Management section select APIs
3. Click on Create API
4. Upload the OpenAPI specification file
5. Select the Gateway that we created in the previous section example
6. In the API Policies section, allow all ( * ) origins for the CORS policy satisfaction, and also the methods that the API includes. If any header is specified in the API Definition that you uploaded, add the header name to the Headers section.


